Add
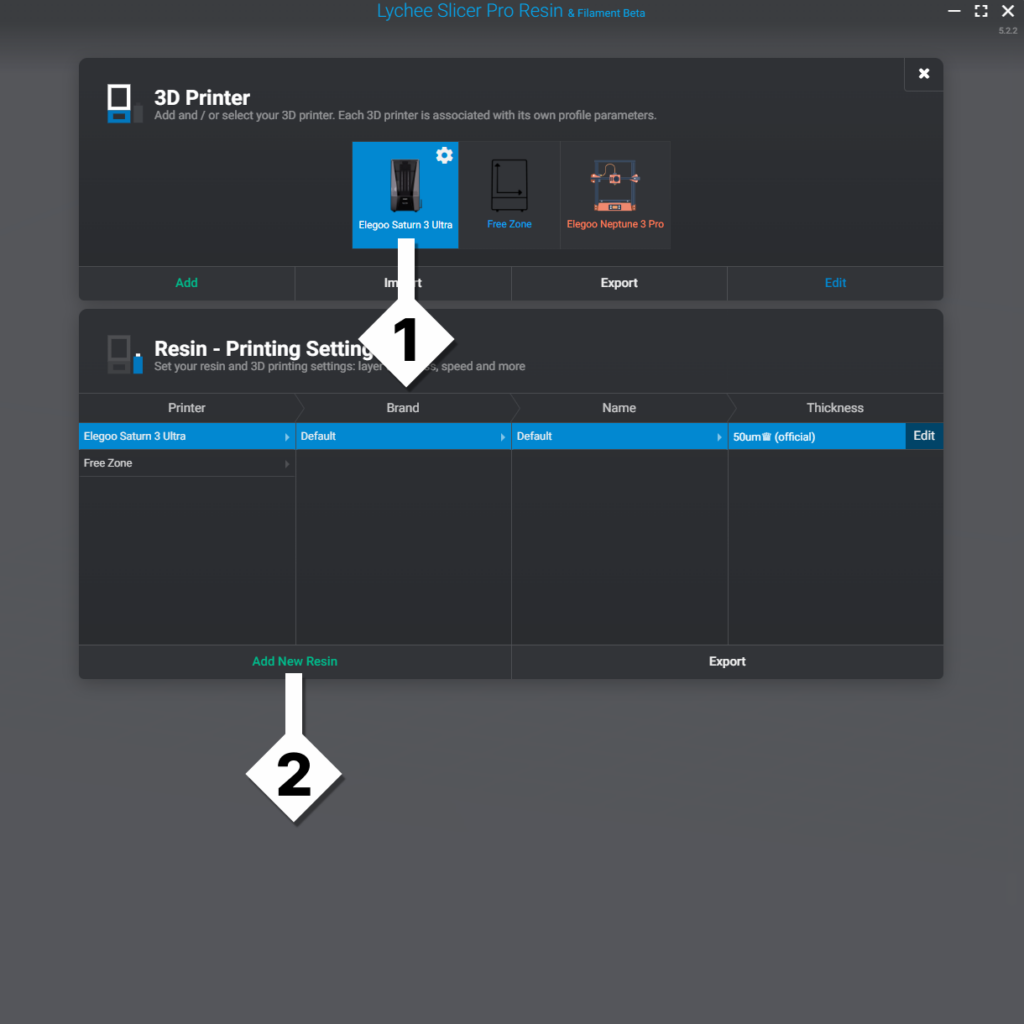
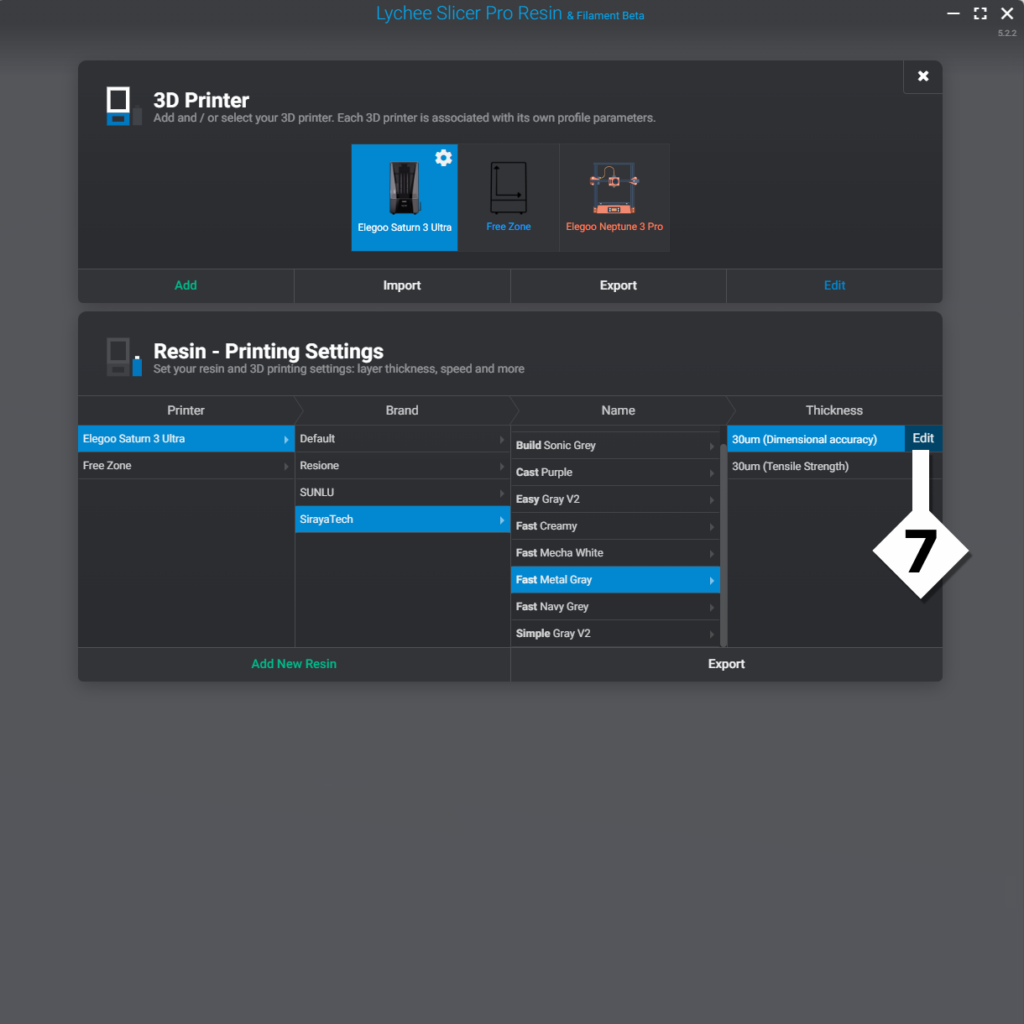
- To add a new Resin, make sure that you have a Resin printer selected (any BLUE one).
- Then click on Add New Resin
Three ways to add a new Resin Profile
Every printer has a unique resin profile. This is because no two printers are alike and will often need unique settings, even for the same type of resin.
Lychee Slicer has multiple options to add a resin profile to your account
Import Resin Profile(s) From a File
This is used if you’re wanting to add a manufacturer’s profile you downloaded from their website. Or if you’re importing a resin profile back-up. These will be saved in the .lyr file format.
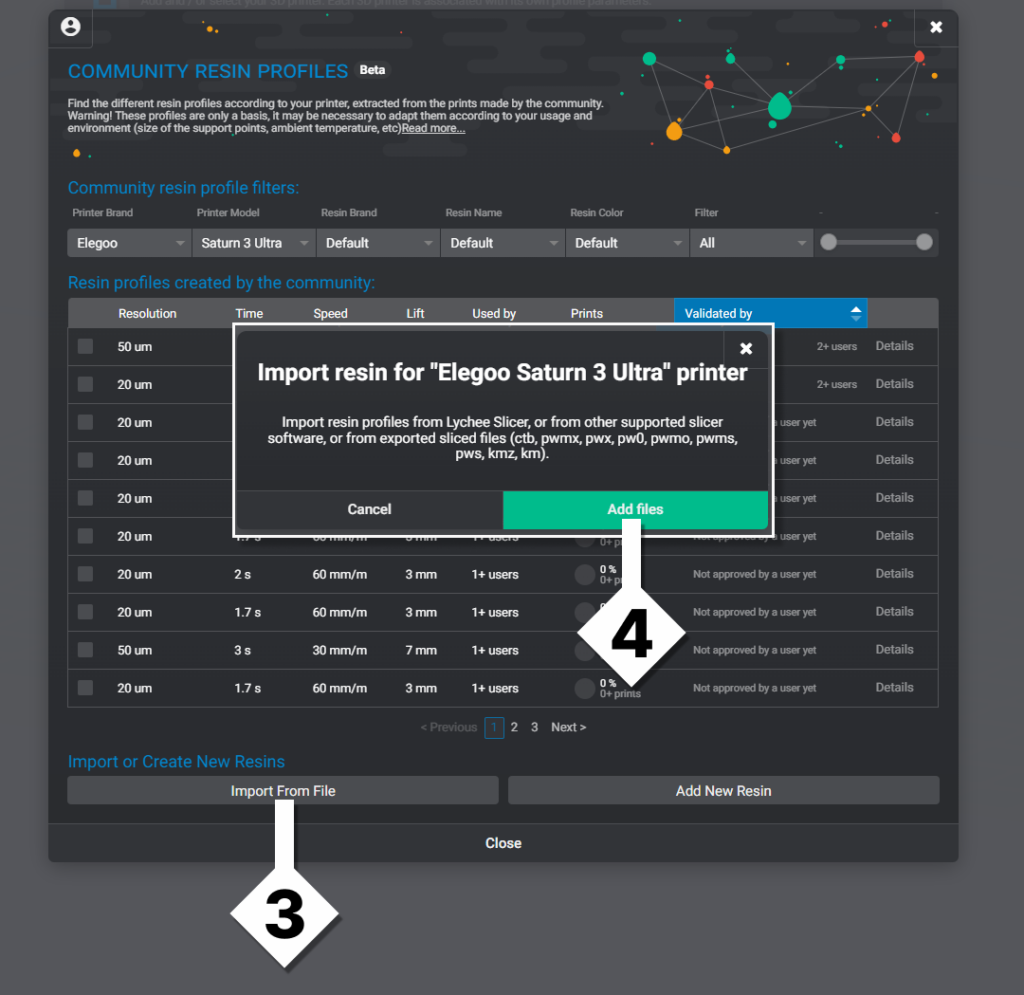
- Click on the ‘Import from File’ button in the lower left hand side of the new menu.
- Click on the Green Add Files button to search your computer for your .lyr file.
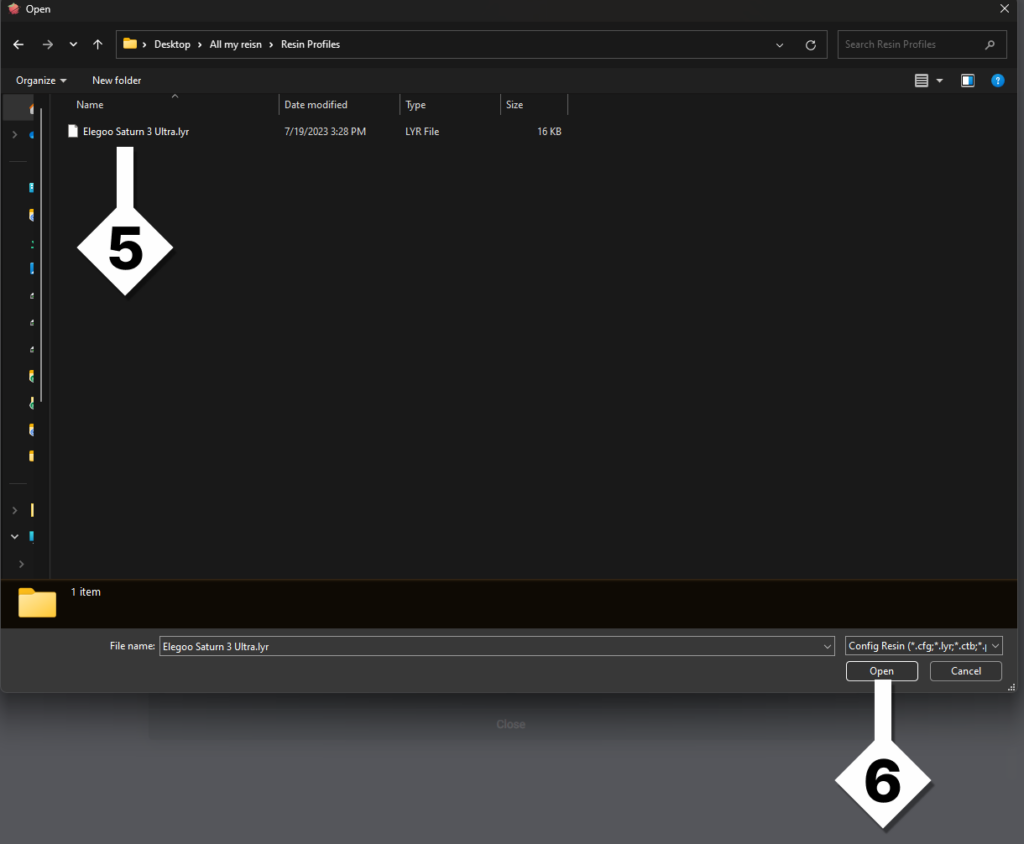
- Navigate your computer’s file system to locate the correct file. Once you’ve located the .lyr file, left-click on it to select it.
- Click Open to load the selected file into Lychee Slicer and associate it with the 3D printer you selected in step 1.
You will want to make sure you’re selecting the correct profile for the selected printer. Lychee Sli will allow you to push/import any profile onto any printer.
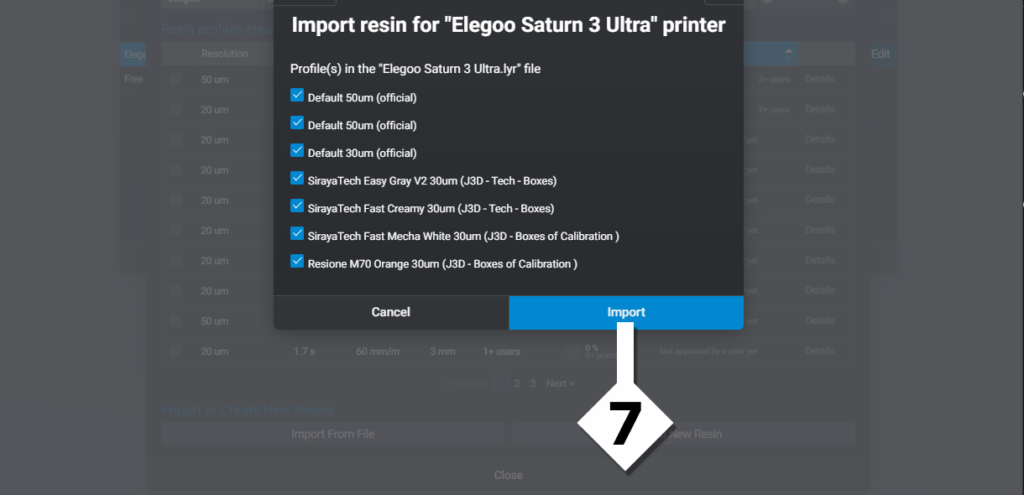
- You will be provided a prompt displaying all the different resin profiles stored in the .lyr file. You can check or uncheck resins before hitting Import. Once you’re satisfied with your selection, click Import.
- You have now successfully imported a resin profile. You can always edit and update any profile at any time.
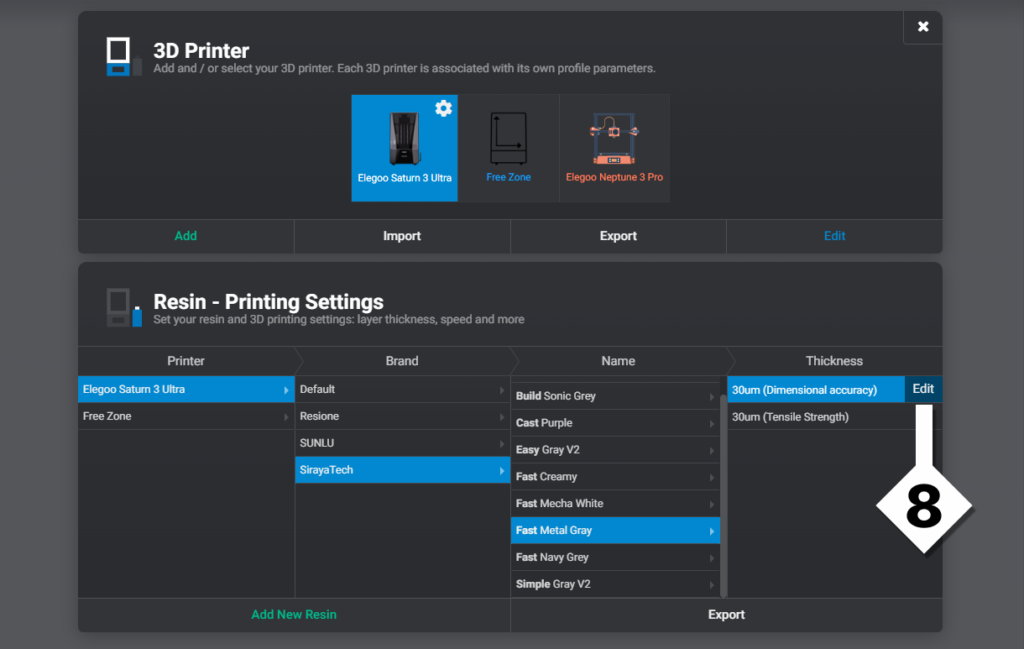
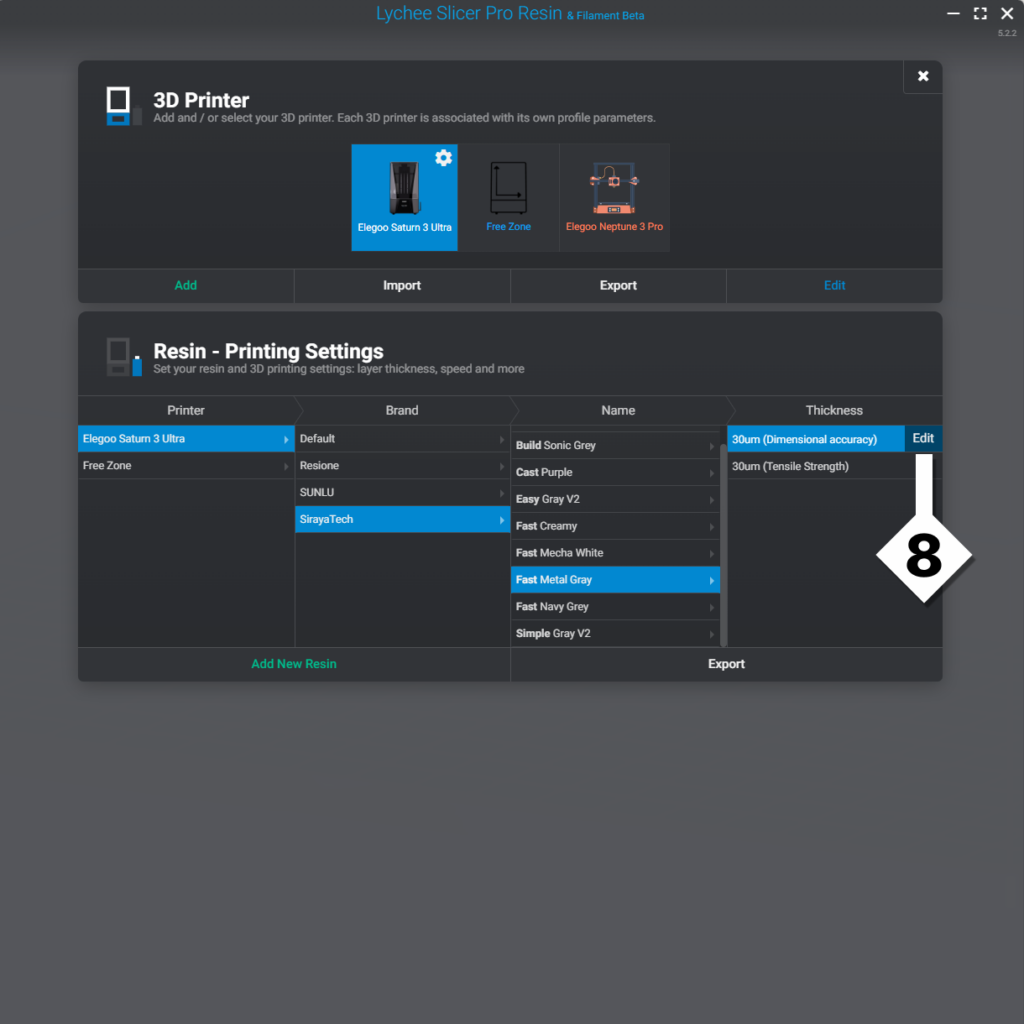
To do this, first select the Printer, Brand, Name and Thickness, then click the Edit button.
Make sure that the highlighted printer on the left, and the highlighted printer on the top match before you edit a profile. These two systems are not linked and you could accidently edit the incorrect profile.
Use a Community Resin Profile
You can sort, view and use a resin profile of Lychee Slicer users like yourself! Using Print History, you can even provide feedback and help your fellow 3D Printing Enthusiasts fine-tune their settings.
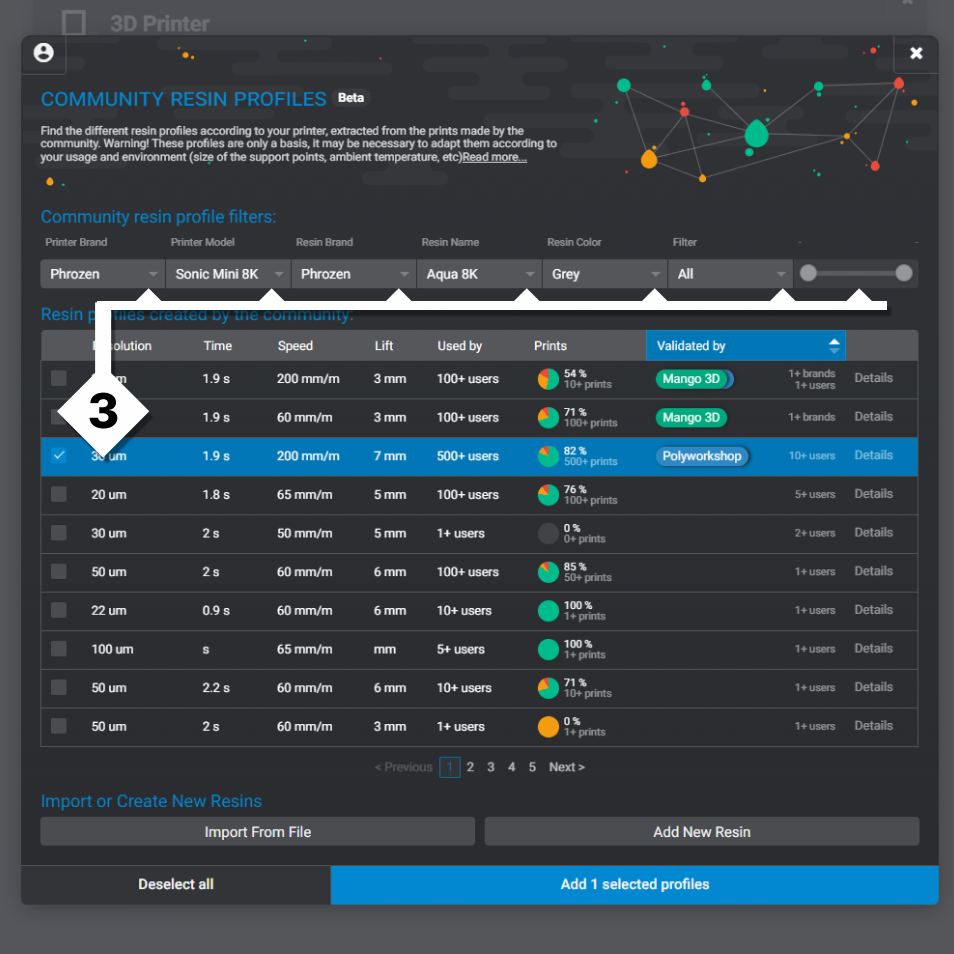
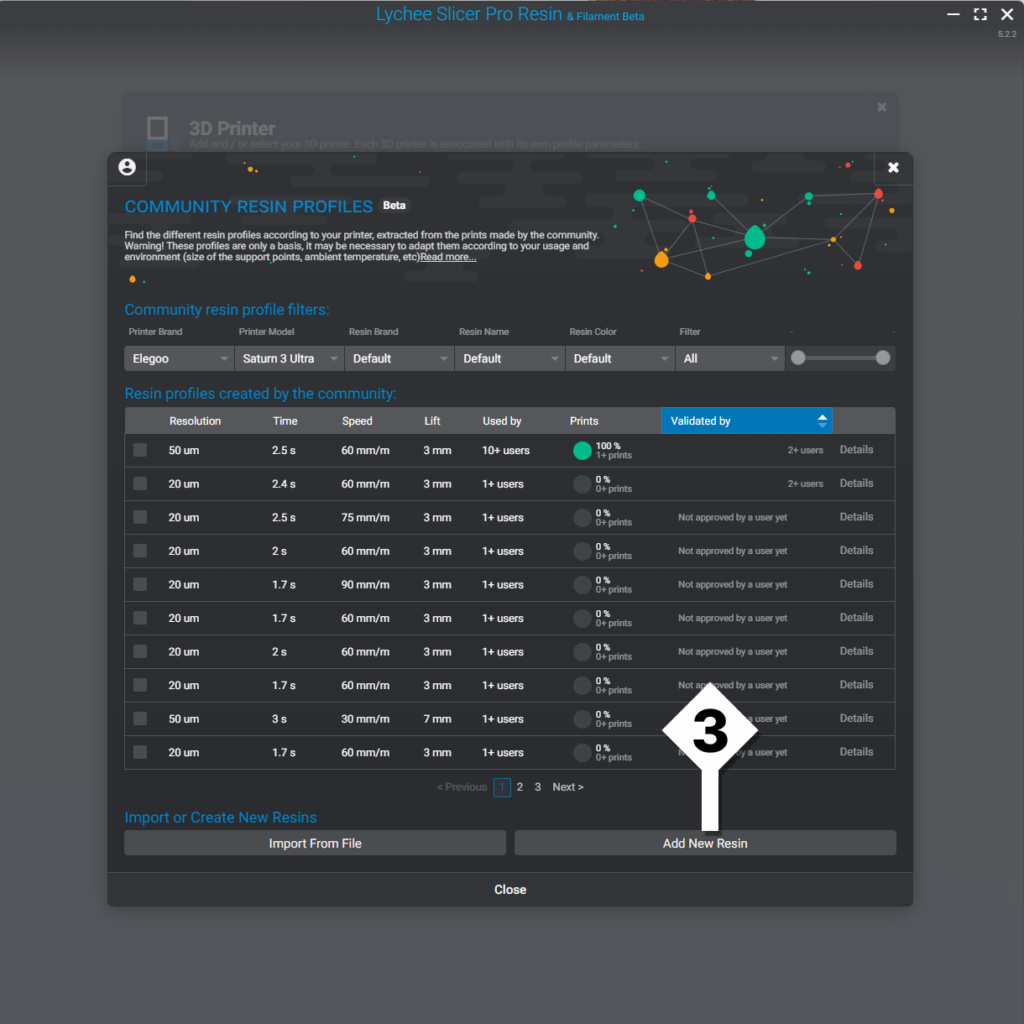
After clicking on Add New Resin in Step 2 above, you will see the Community Resin Profile screen.
- Using the 6 dropdowns and slider you can fine-tune your search to the resin of your choice.
You can also search based on: Profile Validation, Likes, and success rates.
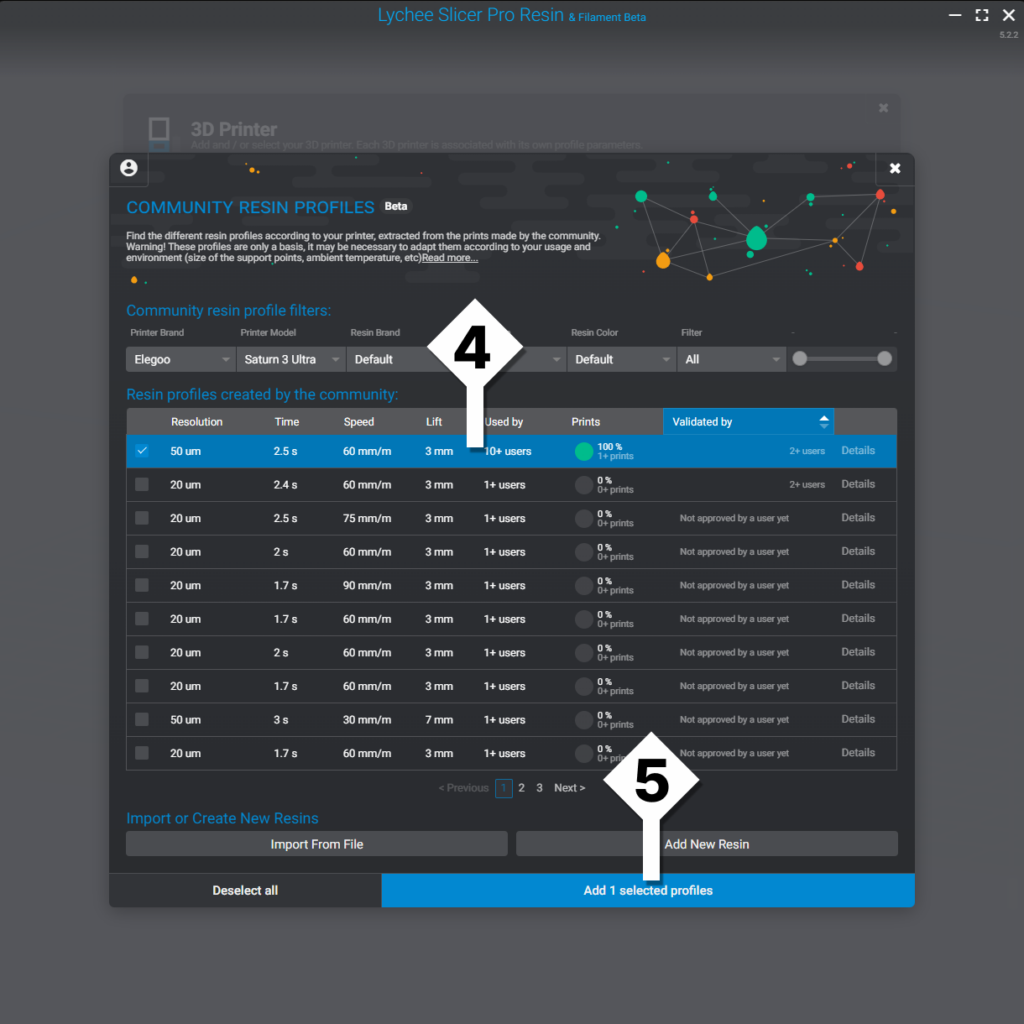
- Once you have found the resin profile you would like to add, left click to highlight it in blue. You may select multiple profiles at a time.
- Click on the Add Selected Profiles button to confirm your selection.
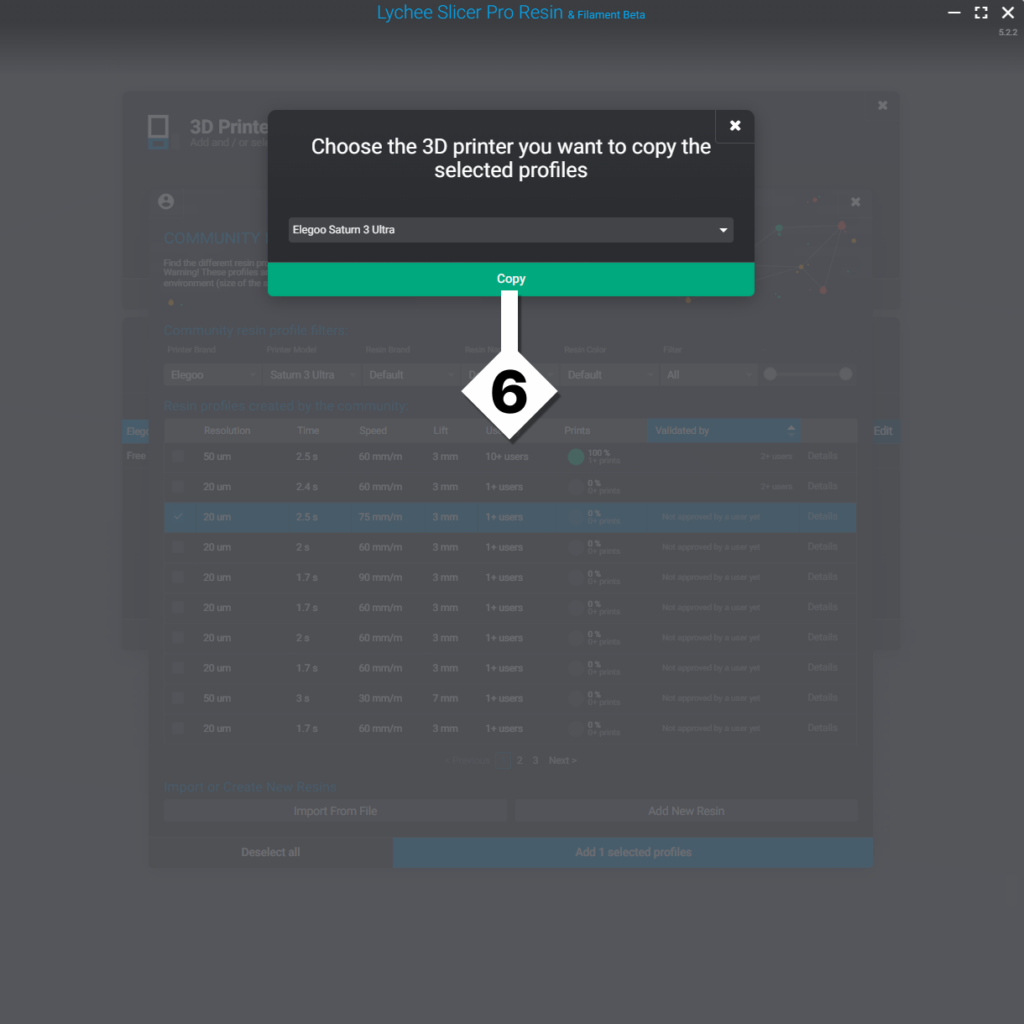
- You’re given one more opportunity to select the printer you would like to add this resin profile to. Remember every printer has a unique resin profile. Use the dropdown to choose the desired printer then click Copy to confirm your selection.
- You have now successfully imported a resin profile. You can always edit and update any profile at any time.
To do this, first select the Printer, Brand, Name and Thickness, then click the Edit button. Make sure that the highlighted printer on the left, and the highlighted printer on the top match before you edit a profile. These two systems are not linked and you could accidently edit the incorrect profile.
Build your own resin profile
After clicking on Add New Resin in Step 2 above, you will see the Community Resin Profile Screen.
- From here you’re going to click on Add New Resin in the Bottom right. This will Automatically create a new Custom Default resin profile.
If the words Custom and Default together are confusing, let me explain. The Lychee Team does its best to make a Default profile that’s automatically added whenever you add a new printer. This profile is locked from any changes but it can be used. The Lychee Team automatically updates this profile to be sure that you always have a good starting place.
The Custom, Default profile is an exact copy, but in this version, you can edit Name and save it!
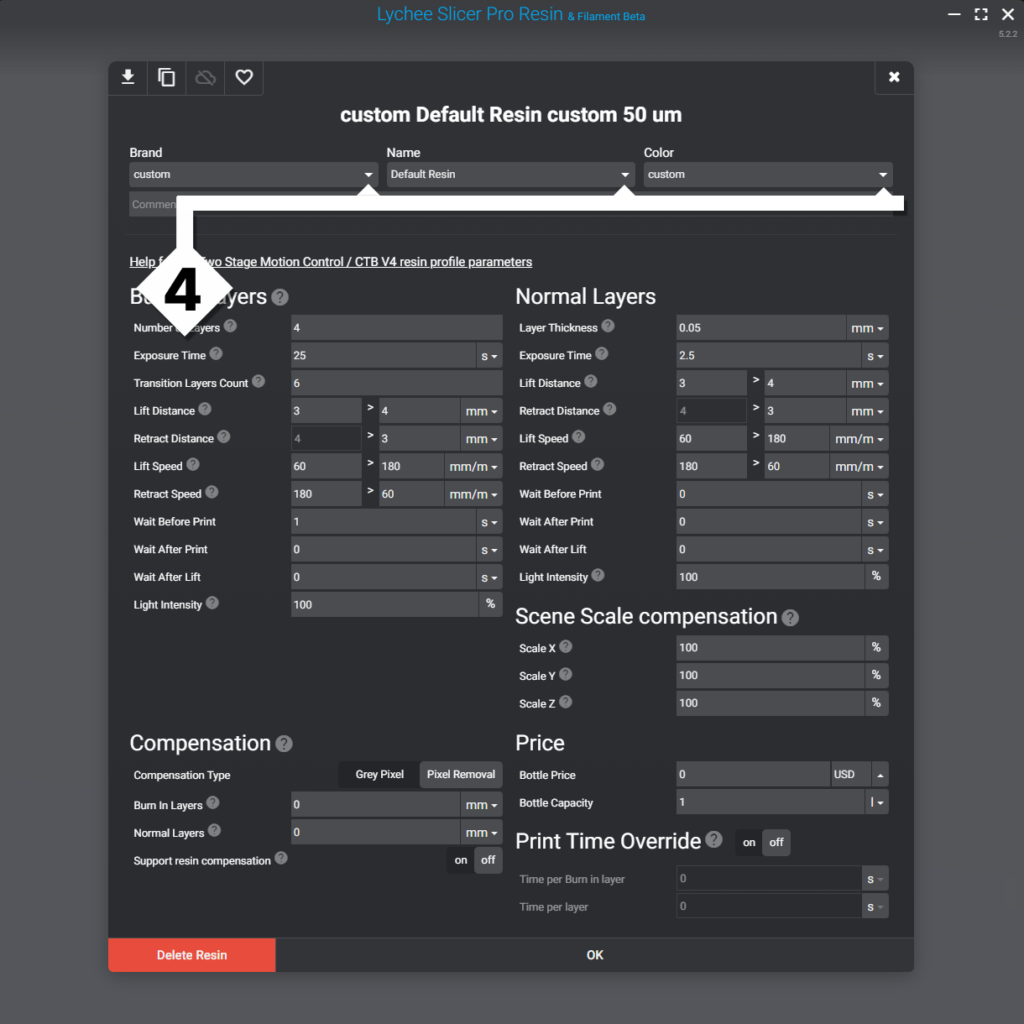
- To keep your profiles organized, you will want to link this Default resin to a Brand, Name and colour. If you’re not sure what to select, your resin should have this information on the cover.
For Example:
Brand = Sirayatech
Name = Fast
Color = Navy Gray
Often you will add an unknown resin or your own mixture. To accommodate this, Lychee Slicer allows you to add a custom name under each of the three fields.
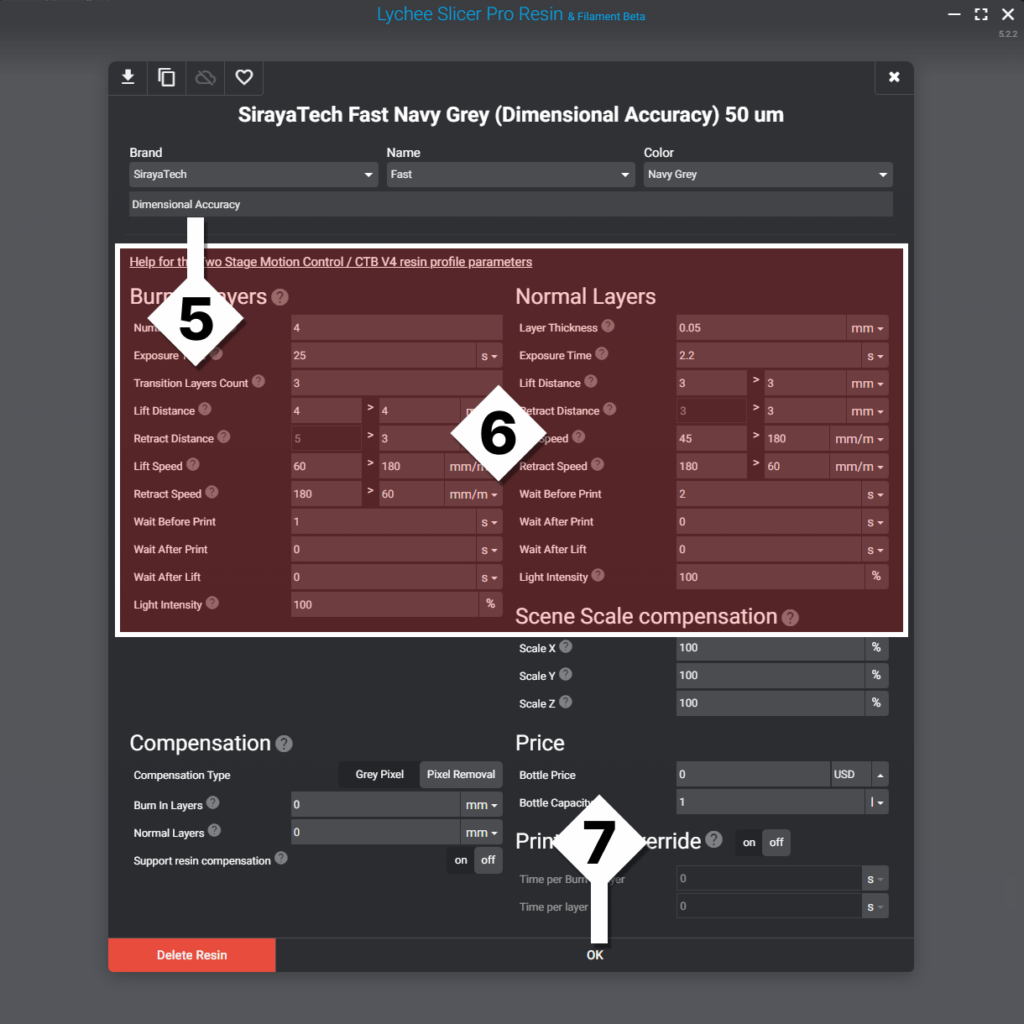
- Next you will want to give your resin a unique name. A good way to name it is to reflect the calibration method.
For Example
Dimensional Accuracy or Tensile Strength
- Adjust the settings to fine-tune how the printer will function during any print sliced using this profile. See this article for a deeper explanation of the printer settings.
- Hit OK to save any changes made.
There is no undo after you hit OK, be sure to double-check your changes first.
- You have now successfully imported a resin profile. You can always edit and update any profile at any time.
To do this first, select the Printer, Brand, Name and Thickness, then click the Edit button.
Make sure that the highlighted printer on the left, and the highlighted printer on the top match before you edit a profile. These two systems are not linked and you could accidently edit the incorrect profile
Last updated on
Tags: Resin