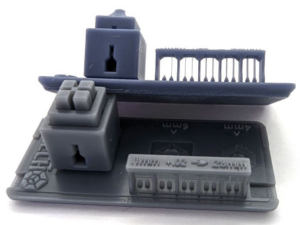
Boxes of Calibration
Used to calibrate Normal Layers, download here.For optimal calibration of Normal Layers, download the boxes here.
A few things to remember before you get started calibrating your printer.
- Most resins require 20c or even up to 30c. At the bottom of this guide I have some heater options. If you’re trying to print and calibrate below 20c, get a heater, it will improve everything.
- You will need to develop your own calibration profile for each resin type, and layer thickness. For example, a clear or flexible resin will need very different settings then a hard opaque resin.
- Don’t ever use a profile you found online, they are not calibrated to your printer.
- There are two main methods of Calibration that I teach.
- Dimensionally Accurate – To successfully print exactly what you think you’re printing.
- Resin Tensile Strength – The maximum stress that a certain material can hold before it breaks.
- There is a 3rd option and that is pure Strength calibration but it’s not often recommended.
- After calibration, failures are most often support or speed related issues.
Next you need to adjust your printer settings.
I’ll go over each setting, explain what it does and some direction of how to set it in preparation for the calibration print. Once you’re done with this section you will have a higher understanding then most users who have been printing for 1-2 years. You will also have developed your first perfect resin profile.
Global Parameters
This section is VERY IMPORTANT
If your printer is using a Chitubox motherboard you will see (Global Parameters) If you don’t, move on to #2.
If available, pick TSMC. Having both on will trigger a Chitubox related bug that will cause neither to work correctly. The recommendation is to set TSMC to on, Light off Delay to off.
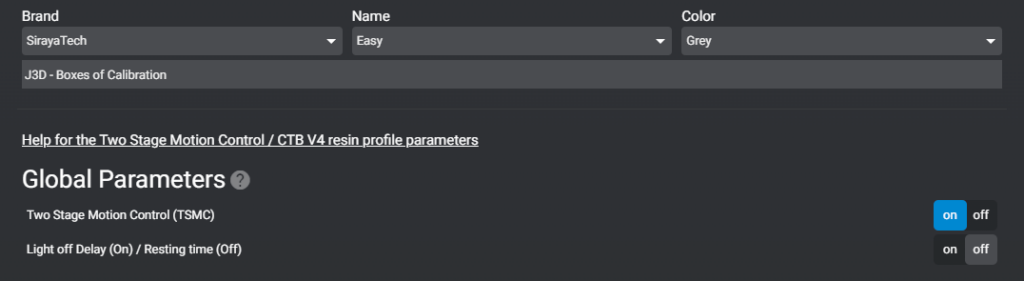
Turning on Two Stage Motion Control (TSMC) enables its use. However, using it will be discussed later in this guide; it’s not necessary for calibration.
Light off delay / Wait before print
A short pause after the printer has fully retracted and before the UV light turns on to cure the resin.
- Gives time for the printer to come to full rest. Lesser known fact: When the motor stops, the printer is still moving. Until the printer’s flex is fully at rest.
- Gives time for bubbles to escape
- I’ve seen little benefit above 3.0s. Unless you have a very large printer or use a very thick resin. There is also a great article that goes into detail here.
Your printer will have one or more of the following settings :
- Light off Delay (set to 2 – 3s)
- Wait After Retract (set to 2 – 3s) This is the same as Light-off Delay
- Wait Before Print (set to 2 – 3s) This is the same as Light-off Delay
- Wait After print (set to 0s)
- Wait After lift (set to 0s)
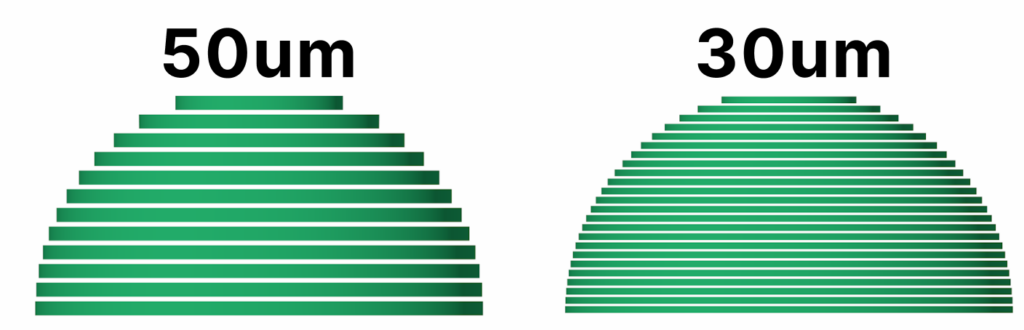
Layer thickness
This is how thick each print layer will be. The lower the number the thinner the layer. Gaining more detail at the cost of longer print times.
- Objects with lots of curves or steep edges can benefit from more layers as it will reduce stepping. This is represented in the image below. The sharper the angle (the top) the more apparent stepping becomes.
- Once you have decided what layer thickness you want to calibrate your printer at, we can move to the next setting. (Default and most common is 50um)
- I print at 30um for show pieces, however larger objects like terrain and props for a D&D set, I recommend 50um or higher. However you will need to develop a new profile.
Printed: 10um – NO AA – 100% Navy Gray & Mecha White – Anycubic M3 Premium*
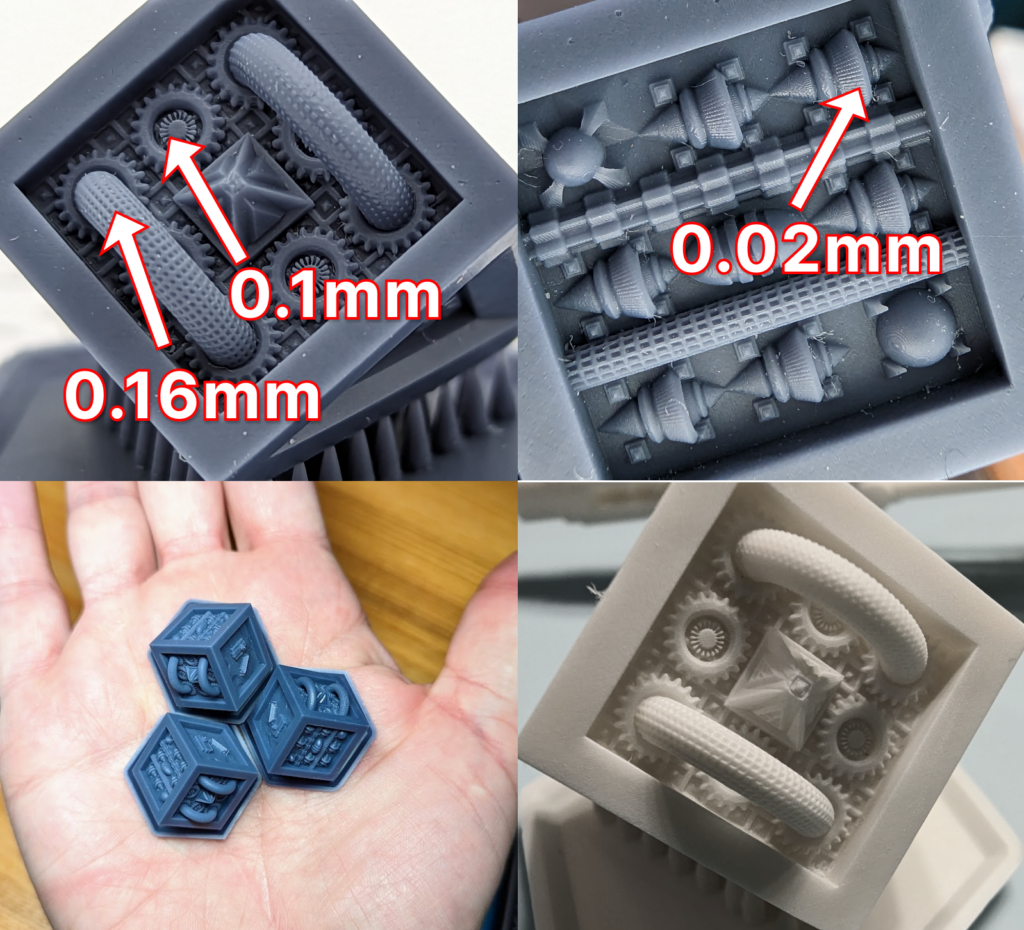
*Many resins recommend not printing lower than 30um or 0.03mm. It’s possible to print at 20 or 10um. However you will want a slow retract speed (60mm/m) and light off delay of 4s or higher.
Exposure time
Use your resin’s recommended UV settings. This is the setting we are printing the calibration tool to adjust.
- How long will each layer be exposed to the UV light?
- Your slicer will have two settings for this. Burn-in / Bottom layers and Normal Layers.
Lift Distance
Set this to 6mm. If you have two boxes, set the first box to 3mm and the 2nd box to 3mm. This setting will depend on the size of your printer and how stiff your FEP sheet is at any given time. The larger the printer, the more your FEP will flex. If you’re using a flexible resin you will also want to increase this setting.
Pro Tip :
To calibrate, watch a print during the burn in layers. You will see/hear it pop from the FEP. See how much further it travels. You want at most 2mm of travel after the pop.
Some printers allow you to adjust this using the LCD while a print is going. Doing this will help you discover a default for all future prints using that resin. Flexible resins will require more distance.
Lift speed
Set to this 40mm/m – 50mm/m. This is how fast the build plate will rip the model off of the FEP after each layer.
- The faster the lift speed the higher chance of layer separation, support failure and build plate separation.
- The faster the lift speed, the faster your print will finish.
Retract speed
Set this to 60mm/m. This is how fast the build plate will lower.
With larger printers, it’s VERY important to slow down the retract speed. Lowering the plate with a large print will put a lot of pressure on the FEP and, more importantly, the screen. Some plates (like the Mega 8K one) have holes. The purpose is to limit the pressure to avoiding killing your expensive 8K screen.
Anti-aliasing
Leave this off for all calibration tests. Will be discussed further in the guide.
In the end…
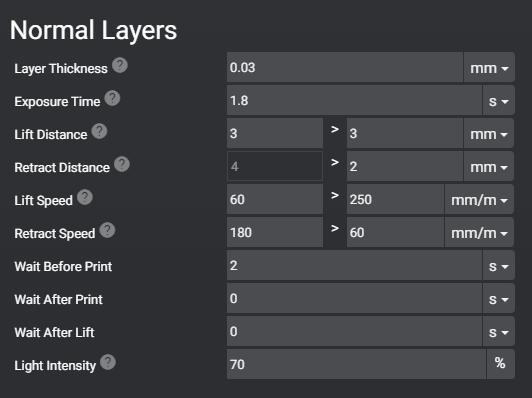
Once finished it should look something like this:
- The Layer Thickness is up to you.
- Exposure time is based on your resin’s default recommendation. Probably between 1.5 and 2.5s.

Last updated on