Not all printers support this, if yours does, these numbers are ONLY EXAMPLES! Please develop your own as my examples may not work for you.
- Primary Objective: Speed up your print time while keeping the same accuracy and success rate.
- Objective 2. Have the model Pop from the FEP 98% of the time during the slower Lift Speed.
- Objective 3. Have enough total lift height to never have a failed FEP release.
- Objective 4. Reduce print time.
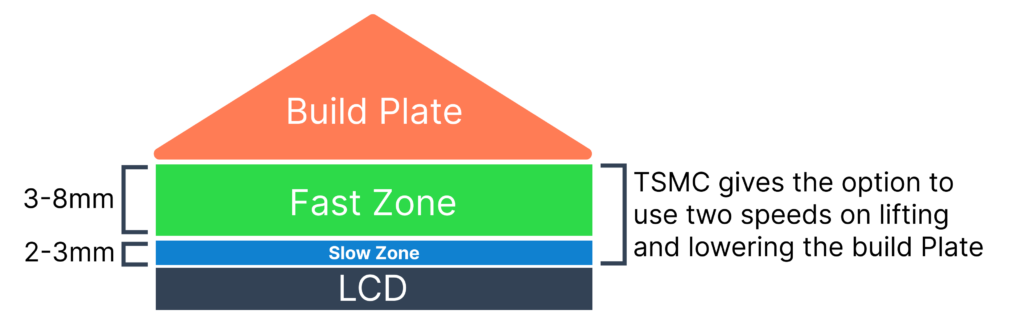
Don’t lift the print so high that the printed surface of the model is lifted out of the resin. Exposure to air can cause failure or layer lines.
Now that you know what Lift/Retract distance and lift speed are, let’s apply that knowledge. If you prefer a video explaining TSMC over reading, click here.
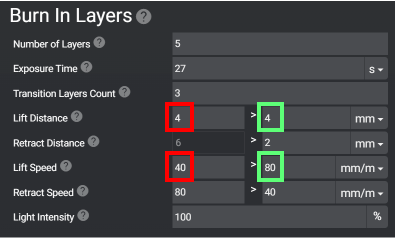
Burn-in / Bottom layers
In this example, I’m lifting the plate a total of 8mm. 40mm/m for the first 4mm PLUS 80mm/m for the final 4mm. That’s right, as I stated before these numbers are added together.
For Retract speed you will notice that the lower number is in the right field.

Example of an Anycubic Printer
Example of a Chitubox based Printer
Normal Layers
In this example, I’m lifting the plate a total of 6mm. 45mm/m for the first 3mm and 200mm/m for the final 3mm. For Retract speed you will notice that the lower number is in the right field.

Example of an Anycubic Printer

Example of a Chitubox based Printer
The two difference between Chitubox printers and Anycubic are:
- 1 The ability to also adjust the retract distance. Don’t get confused by this, simply put a 2 in the left box. (The right box can’t be edited as it’s based on the lift height.)
- Wait before print instead of Light-off Delay, they do the same thing.
See this video explaining TSCM :
Last updated on