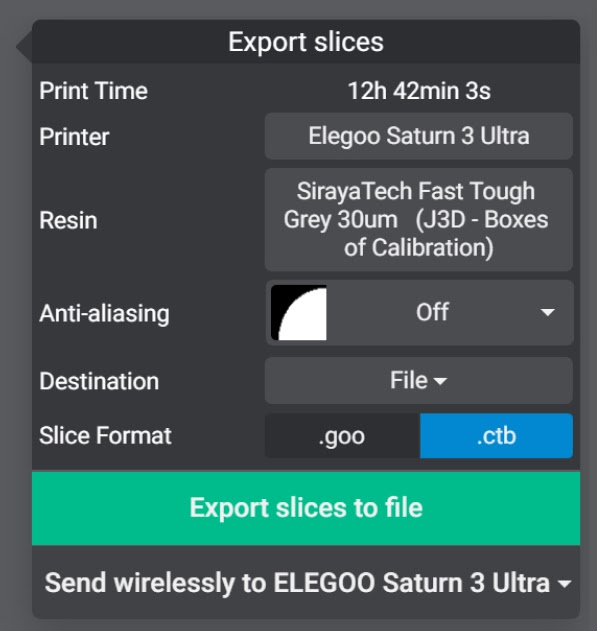
Print Time
- An estimated print time based on the height of the model and the Resin Profile selected.
- For more accurate print times, see Print Time Override here.
Printer
- The currently selected 3D printer for this slice.
- You can click on the printer description “Elegoo Saturn 3 Ultra” in this example to change the printer from this screen if you have multiple 3D printers.
Resin
- The currently selected resin profile for this slice.
- You can click on the Resin description “SirayaTech Fast Tough” in this example to change the resin profile from this screen.
To set up your printer or resin profile check out our other guides here.
Anti-Aliasing or AA
Add Anti-Aliasing to this current Export.
It should be known that adding AA or HD AA to your Export may require a powerful modern PC. Even more so if you’ve selected a printer that has a print screen resolution of 8K or above.
There are three types of Anti-Aliasing to choose from :
- Smooth Surfaces
- Sharpen Details
- Contract Blur.
To learn more about Anti-Aliasing see our other guides here.
Destination
Where, on your PC, would you like to save the sliced file?
It’s highly recommended to always save the exported slice to your local HDD and not to a network drive or USB.
Slice Format
The format the export slice will be saved as. Your printer can only read and process data in this format.
Depending on the Printer selected you may have more than one format option. For example, the Saturn 3 Ultra has two different formats it can read. (.goo) and (.ctb) When available, the option is a personal preference.
Export Slices to File
Once you have selected all of the necessary settings above, you can now click on the big green button to begin slicing.
If you have a wifi enabled printer, Lychee Slicer can render the slices and then automatically send the file to your printer. There are two options available.
Send will only copy the file to the local HDD on the printer, but not start the job.
Send and Print will copy the file to the local HDD on the printer and start the print job. Make sure your printer’s bed is free from any cured resin before you send a file or you may damage your 3D printer.
Last updated on
Tags: Resin