The User Interface provides you with a workspace and tools to display, manipulate and prepare the 3D objects you want to print.
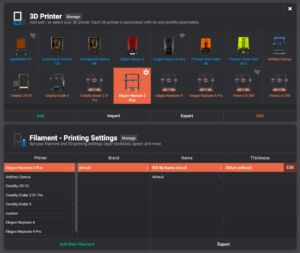
The User Interface can be split into different main features. The first and most obvious one is the 3D space representing the build plate of your printer. That’s why the very first thing you need to do is to tell Lychee which printer you plan to use [add link to the “3D printer” menu].
It will automatically define the build plate size. By defining the actual size of your build plate, Lychee allows you to visualize the space available on your printer, which comes handy when it comes to evaluating your model dimensions.
Does it fit you printer? Is it too big for the available space on your printer’s build plate? Lychee will perform different checks to make sure the model you just dropped on the plate will be printable, and if its dimensions match your printer’s specifications.
If it doesn’t, the 3D model will be displayed in red to catch your attention. You can either rearrange your objects on the build plate so that it can contain all the objects, or you can remove the exceeding parts of your model from the plate.
Moreover, it will perform more than just a dimensional check of your model, it will also perform a verification of your model’s geometry, and check if it will properly interpreted by Lychee, and that it will print correctly. The Mesh repair tool will be available upon model loading.
When launching Lychee for the first time, the interface will prompt you whether you want to recover the last scene, objects and settings from your last session. To start a new project, just dismiss the prompt, if you want to continue a project you’ve already been working on, click “continue”.
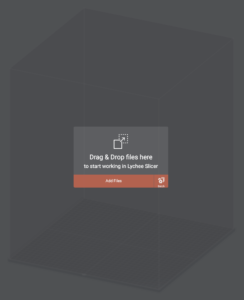
To import a 3d model onto the stage, just drag and drop it from your file explorer, or use the “import” button to use your OS’ native file selector.
The interface is contextual, which means it will display different tools depending on whats on the scene, and what’s selected on the scene.
For instance, importing an object to the stage will enable the Object List. Once an object is selected in the Object List or directly on the stage, its properties will be displayed in the Properties panel. The Toolbar will also display the different tools available for that object.
If you don’t want to import an object or don’t have any to import, you can use the library panel to import a predefined object.
Last updated on